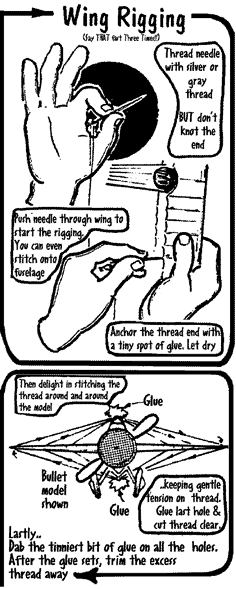
it gets better. I would recommend making holes in the spots where the thread will go before building. Then when you have built the model decide where the thread will start and presumably end as well. Pull out way more thread then you think you'll need and cut that. Wherever your first hole is, anchor the thread with glue and let it dry. It needs to be solidly glued because you will pull real tension against it. Now begin your threading keeping the thread taut at each hole and anchoring again with glue. Aside from that it's really important that you not try any lacquer or finish after the rigging. If you want to do that put it on before rigging otherwise the thread will go slack and harden there.
Others may have more tips but besides that it's just practice. Good luck, Dan (Mar 1, 01)
A third method is similar to the real thing:
1. Make small holes where the rigging is supposed to be anchored.
2. cut very short lengths of string and make small loops that
will protrude through the hole. (forming an "Omega"
or similar). Glue these to the piece that the hole is in. The
easiest way to do this is to glue one end of the loop to the card,
then make a large loop through the hole and put the needle in
that loop. Pulling the string back trough the hole, tighten the
needle flat against the card, glue the string on the back of the
card and once set, cut the excess. This will ensure that the needle
can go through later on. A needle threader is an excellent tool
to use, but not for making the loop.
3. When the model is finished, thread the end of your string through
one of the loops and double it back a bit (1:72 would be 1-2mm).
Glue the "double" together. Measure the length to the
opposite loop, cut the string a little longer than that. Do this
all over the plane until all strings are attached at one end.
Make sure NOT to glue the loop in the card to the "wire-string".
If you make a mistake, you can then cut the string and thread
a new one through the small loop.
4. Now you will use these strings to "true" the plane.
This means that you use the tension to take out warps and unwanted
curves. Double back and tack with a little bit of glue. When dry,
you then cut the end off to make the "double" the same
length as the other end. All strings/wires should be taut, but
not to the point of deforming the card.
This method is easier to use on a larger scale model, bout should be possible on a 1:72 as well,,,,, Ken (Mar 1, 01 )
,,,,,,,Another thing I've heard suggested but have not tried myself is actually taking thin stiff wire (can usually be found at hobby stores) and cutting it to size. I imagine it would look very nice. Dan
The RC wire is easy to work with because it doesn't kink. But, I use the smallest I can find and it is too big for some models. I also take thread and coat it with Aileens. Pull it taught and hang it up with a clip for weight. In 5 min it is ready to use. If it needs tightening up, I just put a dab of glue at the attachment point and pinch the extra thread up against the strut or the fuselage. DAVE (11/15/01)

